This chapter contains the following topics:
The Store contains information that defines how Point of Sale will operate for a specific store. For example, one store can have a different default warehouse, tax code and profit center than another.
To begin:
Select
Stores from the Setup information menu. You will be at the first store screen.
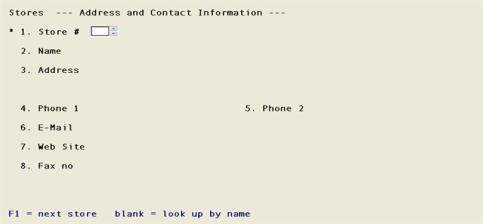
From this screen you can add new stores, make changes to existing stores or delete stores. You will see a screen like the following.
On this screen you enter store contact information.
*1. Store #
Options
Enter the store number you wish to define or use one of the options.
|
<F1> |
Scan through stores in order by store number. |
|
<Enter> |
Search for a store by store name. |
Depending on the invoice number format you have defined in Point of Sale Control information, you may enter a store number of 2 or 3 characters.
|
Format |
Up to two or three characters, depending on the invoice format you have defined in Control information. |
|
Example |
Type A |
2. Name
Options
Enter a name for the store or use one of the options.
|
<F1> |
Scan through stores in order by store name. |
|
<Enter> |
Search for a store by store number. |
|
Format |
Up to 30 characters. |
|
Example |
Type Acme Hardware |
3. Address
Enter the address of the store.
|
Format |
Up to three lines with up to 30 characters per line. |
|
Example |
Type 500 W. Lincoln Blvd. Anytown, TX 12345 |
4. Phone 1
Enter a phone number for the store.
|
Format |
Up to 20 characters. |
|
Example |
Type 800-555-1200 |
5. Phone 2
Enter a second phone number for the store.
|
Format |
Up to 20 characters. |
|
Example |
Type 972-555-1243 |
6. E-mail
Enter an email address for the store.
|
Format |
Up to 60 characters. |
|
Example |
jwilliams@acmehardware.net |
7. Web site
Enter the web site address for the store.
|
Format |
Up to 60 characters. |
|
Example |
www.acmehardware.net |
8. Fax no
Enter a fax number for the store.
|
Format |
Up to 20 characters. |
|
Example |
Type 972-555-1299 |
Field number to change ?
Options
Make any desired changes or use an option:
|
<Enter> |
to go to screen 2 |
|
<ESC> |
to discard the information as entered and exit Stores. |
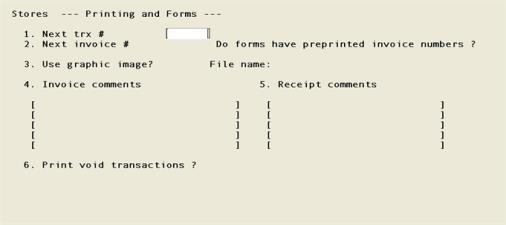
On this screen you may enter or change the comments that print on your invoices and receipts. You may also define the next transaction number, next invoice number and other form printing related options. You will see the following screen:
Enter the following fields:
1. Next trx #
This number will be assigned to the next transaction that is entered in Transactions. Each time a new transaction is entered, this number will be incremented by one.
|
Format |
Up to six digits (999999) |
|
Example |
Type 100001 |
2. Next invoice #
This number will be assigned when the next invoice or receipt is printed. Each time a new invoice is printed, this number is incremented by one.
|
Format |
Up to five or six digits, depending on the invoice format you have defined in Control information. |
|
Example |
Type 1 |
Do forms have preprinted invoice numbers ?
If you are using forms with preprinted invoice numbers, enter Y. If your forms do not have invoice numbers printed on them, enter N. If you enter N, the software will print invoice numbers on your forms for you.
|
Format |
One character, either Y or N. |
|
Example |
Type N to indicate that your forms to not have preprinted invoice numbers. |
3. Print using graphic image?
Answer Y to use a graphic image form file to merge with the data or N to print without an image file when printing end of day invoices.
See the Form File Use and Design section in the More on PBS Printing chapter In the PBS Administration documentation to learn more about modifying the PBS graphical file examples or creating your own from scratch.
|
Format |
One letter, either Y or N |
|
Example |
Type N |
If you answer Y, then you will be prompted to enter the name of the file.
If you are using a graphical image file, then you must select Windows printer or a Company information PDF printer when you print POS forms.
Windows printer is only available when running PBS on Windows or Thin Client, but the Company information PDF printer is available for printing forms on all the supported PBS systems.
File name:
Enter the name of the file that will merge with the forms data. This file must be of a JPEG or Bitmap file format only. The file must be present in the top-level PBS directory called IMAGES and must be spelled exactly as the file name including the proper extension.
If running in Linux or UNIX Thin client, the file name must be entered with the same (UPPER or lower) case and do NOT use a period as part of the file name.
|
Format |
12 characters including the extension that must be either .jpg or .bmp. |
|
Example |
Enter PS651.JPG |
4. Invoice comments
Enter the comments that you wish to print on all invoices generated from this store. Use spaces if you would like the text centered when it prints.
|
Format |
Up to five lines with up to 30 characters on each line. |
|
Example |
Type Thank you for shopping at XYZ Company |
5. Receipt comments
Enter the comments that you wish to print on all receipts generated from this store. Use spaces if you would like the text centered when it prints.
|
Format |
Up to five lines with up to 25 characters on each line. |
|
Example |
Type Thanks for shopping at XYZ Company |
6. Print void transactions ?
Select Y to print void transactions or N to not allow it. When Y is selecting a void transaction must be printed before it will post.
|
Y |
Force the user to print a void transaction before it will post to history |
|
N |
The user does not have to print a void transaction for it to post to history |
|
Format |
1 character Y or N |
|
Example |
Type N to print void transaction |
Field number to change ?
Options
Make any desired changes or use an option:
|
<Enter> |
to move to screen three |
|
<ESC> |
to discard the information as entered and exit Stores. |
On this screen you enter account information.
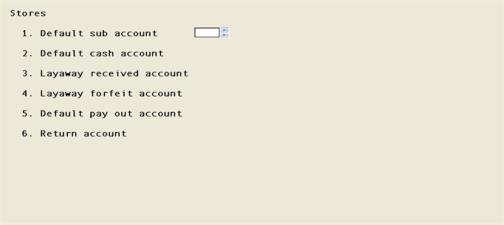
1. Default sub account
Enter the default sub-account number to be used for this store. If you are not using sub accounts, this field is not applicable (N/A).
|
Format |
Your standard account number format as defined in Company information. |
|
Example |
Type 100 |
2. Default cash account
Enter the number for a default cash account. This account is used for posting pay-outs.
|
Format |
As defined by your account number structure |
|
Example |
Type: 1000-000 |
3. Layaway received account
Enter the number of the G/L liability account to use when receiving and posting layaway cash.
|
Format |
As defined by your account number structure |
|
Example |
Type: 2080-000 |
4. Layaway forfeit account
Enter the number of the G/L account to use in layaway transactions as the forfeit account.
|
Format |
As defined by your account number structure |
|
Example |
Type: 8510-000 |
When a customer does not return to pay the remainder due for the item you may choose to forfeit this amount and realize the payment as cash.
5. Default pay out account
You must have selected Y to Use A/P in the POS control information for this field to be enterable. If you selected N then the value for this field will be (Not applicable).
Enter the default payout account number for when you payout from a cash drawer.
|
Format |
As defined by your account number structure |
|
Example |
Type: 5070-000 |
6. Return account
Layaways can be cancelled without an immediate refund. The intention is to later process an A/P check refund to the customer.
On the transaction screen, after selecting an existing layaway, select Cancel - refund later. When posting the refund the amount will post to this account.
Enter the account for which you are going to later process a check refund.
|
Format |
As defined by your account number structure |
|
Example |
Type: 7030-000 |
Field number to change ?
Options
Make any desired changes or use an option:
|
<Enter> |
to move to screen four |
|
<ESC> |
to discard the information as entered for the store |
This store screen requires that you enter some default codes and layaway settings.
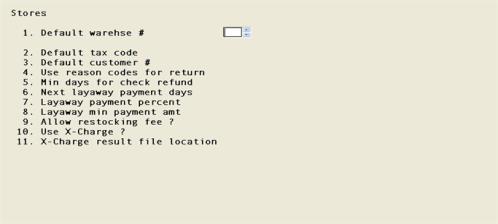
1. Default warehse #
The default warehouse is the warehouse that is displayed for this store. The warehouse you enter here must be defined in Inventory Control.
Depending on how registers are defined, a user may be able to access other warehouses but the default warehouse is the warehouse that is initially displayed. For further information, refer to the 12. Allow warehouse change ? field in the Registers chapter.
Enter the default warehouse or use the option:
|
<Enter> |
Leave the field blank to default to the Central warehouse. |
|
Format |
Three characters |
|
Example |
Type 1 for the Main Warehouse |
2. Default tax code
Enter the default tax code for this store. This is the tax code that will be used to calculate taxes for walk-in customers. This tax code must be defined in Tax Codes in Accounts Receivable.
|
Format |
Up to three characters |
|
Example |
Type CTY |
3. Default customer
The default customer is useful when you have mostly walk-in customers and you are not required to record sales to specific customers. This number must be defined in Customers in A/R. Enter the default customer or use the option:
|
<Enter> |
Leave the field blank and not use a default customer |
|
Format |
Up to twelve characters |
|
Example |
Type Walk-in |
4. Use reason codes for return
This entry is asking the question do you want to use reason codes when returning merchandise.
|
Format |
1 character, either Y or N |
|
Example |
Type Y to allow reason codes for return |
5. Min days for check refund
This is the minimum number of days to wait before processing a check refund, allowing time for the check to clear at the bank.
|
Format |
Numeric 999 |
|
Example |
Type 10 for minimum number of days |
6. Next layaway payment days
This is the number of days when the next layaway payment is due. The next payment due date prints on the receipt.
|
Format |
Numeric 999 |
|
Example |
Type 14 |
7. Layaway payment percent
This entry in this field is only used when you enter a layaway transaction type.
Enter the minimum percentage.
You may assign a minimum payment percentage for layaway transactions. When entering a payment for a layaway you may select a function key to automatically calculate the minimum payment.
|
Format |
Numeric 99.99 |
|
Example |
Type 25 |
8. Layaway minimum payment amt
This entry in this field is only used when you enter a layaway transaction type.
Enter the minimum amount.
You may require a minimum amount for a layaway payment regardless of the minimum percentage entered in the previous field. This amount displays in the payment window.
|
Format |
Numeric 999999.99 |
|
Example |
Type 50 |
If you entered a minimum percentage, and the calculated minimum percentage is less than the minimum payment amount, then the minimum payment amount will display in the payment window.
9. Allow restocking fee ?
Options
Select the type of restocking fee.
|
P |
To enter a percentage of the transaction gross for restocking fee |
|
A |
To enter a fixed amount for the restocking fee |
|
N |
To not use a restocking fee |
If you entered N then you will not be able to enter the next field.
(Amount or Percent)
There is no label for this field.
If P is entered for the previous field then enter a percent of sale which calculates the restocking fee. If A is entered then enter an amount which will be the same for every transaction.
|
Format |
99999.99– (amount) 999.99– (percentage rate) |
|
Example |
Type 15 |
10. Use X-Charge ?
If you are using the XCharge Credit Card Processing software with PBS Point of Sale, select Y, otherwise enter N.
|
Format |
One character, either Y or N. |
|
Example |
Type N to not interface with X-Charge. |
See the Credit Card Configuration appendix for more information on setting up X-Charge with PBS.
11. X-Charge result file location
You may only enter this field if you selected Y to Use X-Charge. When using XCharge, it is necessary that a result file gets saved on the system. This is the result of the charging the credit card.
Enter the path for saving result files. It may be a drive letter path or UNC path. The path must end with a trailing “\” and it must not contain spaces. If you are using PBS over a mapped network drive, then this path may be any location as long as each POS user's workstation has the same folder path on their system.
If you are using PBS via Thin client or RDP, then the path must exist in the server.
When using XCharge with A/R Cash receipts, Invoices and O/E Orders, the path to the result file is not changeable. It is set to the top-level PBS folder of XCRESULT. If you want all the result files to go to the same folder, then enter a path to this folder.
|
Format |
2 lines of 65 characters |
|
Example |
Based on the setting for field 8, you will not be able to enter this field. |
See the Credit Card Configuration appendix for complete information on setting up XCharge with PBS and for an explanation of a result file.
Field number to change ?
Options
Make any desired changes or use an option:
|
<Enter> |
to save the information from all store screens as entered. |
|
<ESC> |
to discard the information as entered for the store. |
Use this selection to print a list of your stores. You may elect to include all stores on your list or you may select a range of stores to include on your list.
Select
Stores from the Reports, setup menu. The following screen displays:
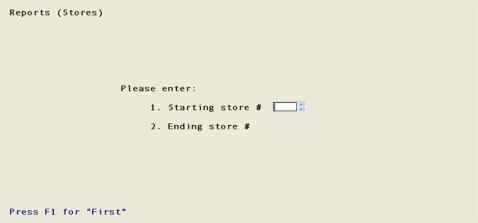
1. Starting store #
Enter the number of the first store that you want to print on your list or use the option:
|
<F1> |
to select the first store. |
|
Format |
Up to three characters. |
|
Example |
Press <F1> default to the first store. |
2. Ending store #
Enter the number of the first store that you want to print on your list or use the option:
|
<F1> |
to select the last store. |
|
Format |
Up to three characters. |
|
Example |
Press <F1> to default to the last store. |
Field number to change ?
Options
Make any desired changes or use an option:
|
<Enter> |
to go to the printer selection screen. |
|
<ESC> |
to discard the information as entered and re-enter your list parameters or exit this selection. |